

Why Does The Email Service Require Both Smtp And Pop3 To Be Activated?
Most people know Gmail for its clean interface and useful features, like search operators and add-ons. Just you can also use Gmail for more: the Gmail SMTP server.
With the Gmail SMTP server, y'all'll exist able to transport emails from your Gmail business relationship using other email clients, such equally Outlook or Thunderbird. Only more importantly, you can also use Gmail's SMTP server to send emails from your WordPress site. For complimentary!
This is a actually great mode to make your WordPress site'due south emails more than reliable without needing to spend coin on a defended email sending service. Gmail lets you send up to 500 emails per twenty-four hours, which is more than enough for the vast majority of WordPress sites.
In this post, we'll cover everything you demand to know most the Gmail SMTP server including:
Check Out Our Video Guide to Using the Gmail SMTP Server to Ship Emails for Free
How to Find the SMTP Server for Gmail
Permit'southward start with the virtually of import question – what is the Gmail SMTP server?
To observe the Gmail SMTP server, you tin use these details:
- Gmail SMTP server accost: smtp.gmail.com
- Gmail SMTP proper noun: Your total name
- Gmail SMTP username: Your full Gmail address (east.g. [e-mail protected])
- Gmail SMTP password: The password that you lot use to log in to Gmail
- Gmail SMTP port (TLS): 587
- Gmail SMTP port (SSL): 465
At that place are also some other common (but not universal) Gmail SMTP settings you might find when trying to set things upwards. Hither's how to answer them if you run across them:
- Requires SSL: Aye
- Requires TLS: Aye
- Requires authentication / Utilize authentication: Yes
- Requires secure connection / Use secure connectedness: Yes
Gmail SMTP Server FAQs
Earlier diving in, let's respond some common questions nearly Gmail SMTP server.
What Is the Gmail SMTP Server Address?
As we detailed above, the default server address is smtp.gmail.com. Y'all can log in using your full Gmail email address and your Google password.
Tin I Utilize the Gmail SMTP Server for Sending Email?
Yes! You lot can. If yous're using other electronic mail clients, such as Thunderbird or Outlook, y'all can apply the Gmail SMTP server details to notwithstanding send emails via your Gmail account.
Yet, remember that SMTP is just for sending electronic mail. If you want to also receive emails to your Gmail account in another electronic mail client, y'all'll demand to use POP3 or IMAP. You tin discover these settings past opening your Gmail settings and going to the Forwarding and POP/IMAP tab.
Can I Use the Gmail SMTP Server to Send WordPress Transactional Emails?
Besides yeah! WordPress sends a lot of bones transactional emails for things like password resets, notifications, etc. and yous tin can evangelize all of those emails using the Gmail SMTP server.
With just a free Gmail business relationship, you'll be able to send up to 500 emails per day, which is significantly higher than the limits that other free SMTP servers use.
If y'all have a paid Google Workspace account (formerly G Suite), Google will heighten your limit fifty-fifty higher and let you ship upwardly to 2,000 emails per day. You lot'll also be able to transport emails from your own custom domain name instead of your Gmail accost. That is, yous can send from [electronic mail protected] instead of [email protected]. To do then, yous'll besides demand to set up Google Workspace MX records to connect your Google Workspace account to your custom domain name.
Annotation: Technically, the sending limits aren't "per day". Instead, the limits utilize to a "rolling 24 hour catamenia". For example, y'all couldn't send 500 emails at 11:59 PM on Monday and then some other 500 emails at 12:01 AM on Tuesday.
Does the Gmail SMTP Server Still Work With Two-Factor Authentication?
Aye! You can use the SMTP server even if you've enabled ii-cistron authentication on your Google business relationship. Nonetheless, you will need to generate an app countersign so that the app can nevertheless connect.
You tin generate an app password by visiting this page while logged into your Google account.
All the same, if you want to use Gmail's SMTP server to send your WordPress site's emails, we don't recommend using this approach. Instead, you should use the Gmail API method that we'll detail in the tutorial below. This lets you send emails using Gmail's API instead of just entering the SMTP server details, which likewise has the benefit of avoiding issues with two-factor authentication.
How to Configure WordPress to Transport Emails via Gmail SMTP Server
Now, let'southward go into how yous can use the Gmail SMTP server to send your WordPress site's transactional emails for gratuitous. This method works great and will amend the reliability of your site's emails over using the default PHP mail method.
To set this up, you lot'll demand to create a Google app then that y'all tin can connect to the Gmail SMTP server via the API instead of simply plugging in the SMTP details. At that place are a good number of steps involved in doing this. This is just a 1-fourth dimension setup procedure. That is, in one case you lot have the thirty-sixty minutes to get through this setup, your site will continue to do good on autopilot.
In addition to creating a Google app, yous'll as well need the help of a WordPress SMTP plugin. Nosotros're going to use the free Post SMTP Mailer/E-mail Log plugin, merely the costless WP Mail SMTP plugin is too another good option that supports the Gmail API.
The basic procedure goes like this:
- Install the Post SMTP Mailer/Email Log plugin (you demand to do this first to get the URLs to use in your Google app).
- Create a Google app. This is the nigh complicated part of the process, but we'll guide you through every pace.
- Add your Google app API keys to the Post SMTP Mailer/E-mail Log settings.
- Send a test electronic mail to make sure everything is working.
Note – this tutorial is focused on using a complimentary Gmail account. However, you can follow a similar procedure to configure your site to send emails via your Google Workspace (G Suite) account.
1. Install and Configure Post SMTP Mailer/Email Log
To get started, you lot demand to install and activate the free Mail service SMTP Mailer/Email Log plugin from WordPress.org. This is what lets you configure your WordPress site to ship emails via the Gmail API/SMTP server.
Afterwards activating the plugin, go to the Post SMTP tab in your WordPress dashboard and click the Show All Settings link underneath the large Showtime the Wizard button.
Then, become to the Message tab and set your "from" email address and name. You can use your Gmail address as the "from" email, or y'all could utilise a dissimilar email accost if you prefer.
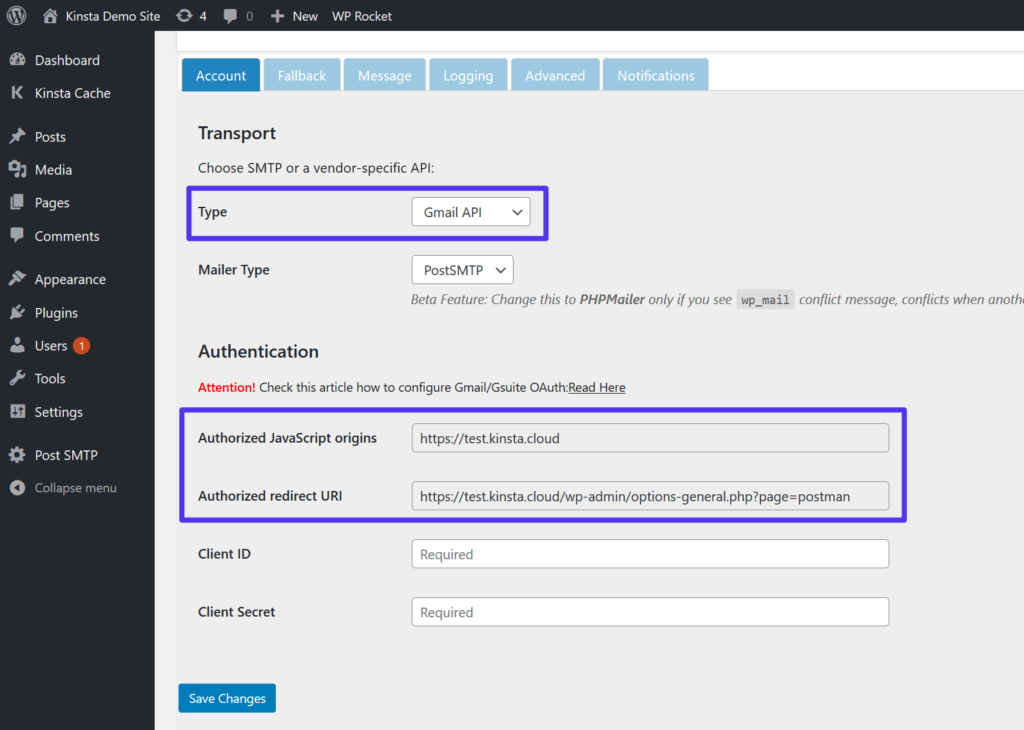
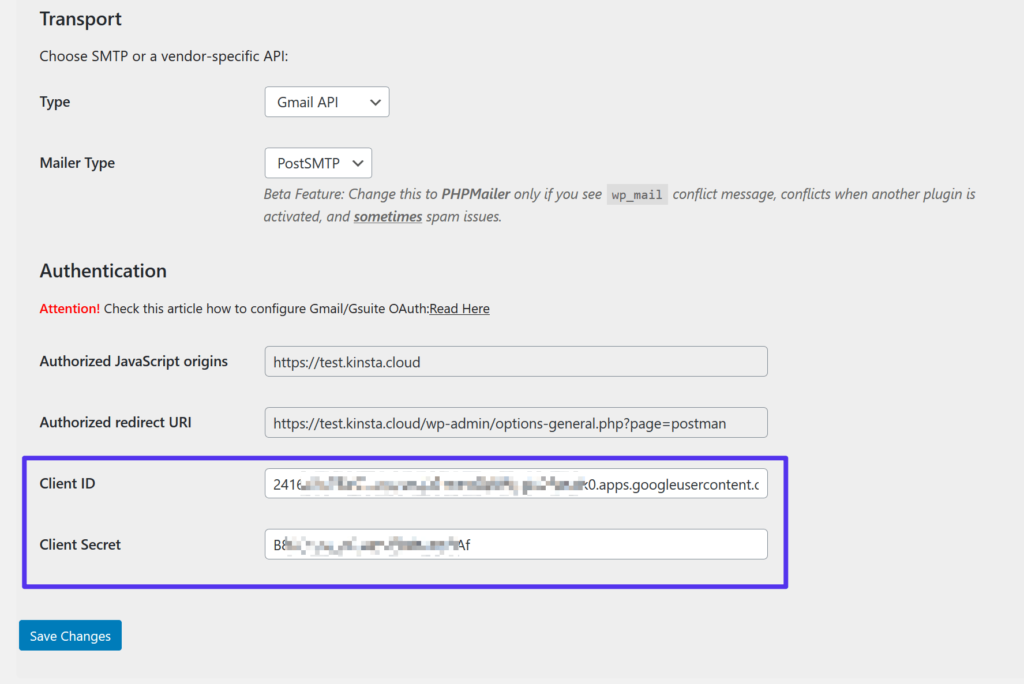
Next, go back to the Account tab and choose Gmail API in the Type drop-downward. Once you brand this choice, you should see some additional options in the Authentication box below. Keep this folio open because you're going to need the Authorized JavaScript origins and Authorized redirect URI details in the next pace:
ii. Create Your Google App
Now, you need to create a Google app. This is what allows your WordPress site to deeply send emails via the Gmail API. Once more, this is definitely the nearly complicated role of this process. However, information technology's mainly just clicking lots of buttons, and we'll give you all the steps/screenshots y'all need to make information technology through.
Create a Project
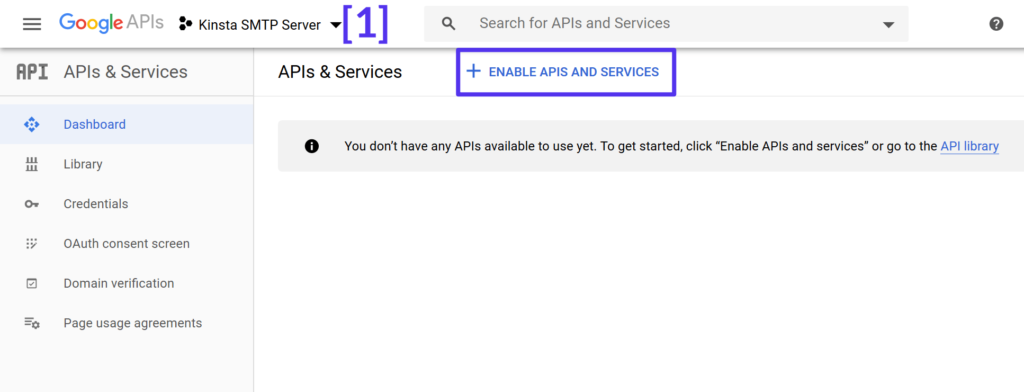
To get started, open a new tab and copy this URL to get to the Google Developers Console. In that location, you lot need to create a new project. If it'south your first time logging into the Developers Console, Google will prompt you to create your first project. Or, if yous already have some projects, you can create a new 1 past clicking the dropdown in the elevation-left corner (marked by [1] in the screenshot below).
Enable the Gmail API
Once you lot've created your projection, click the button to Enable APIs and Services(shown in the screenshot above).
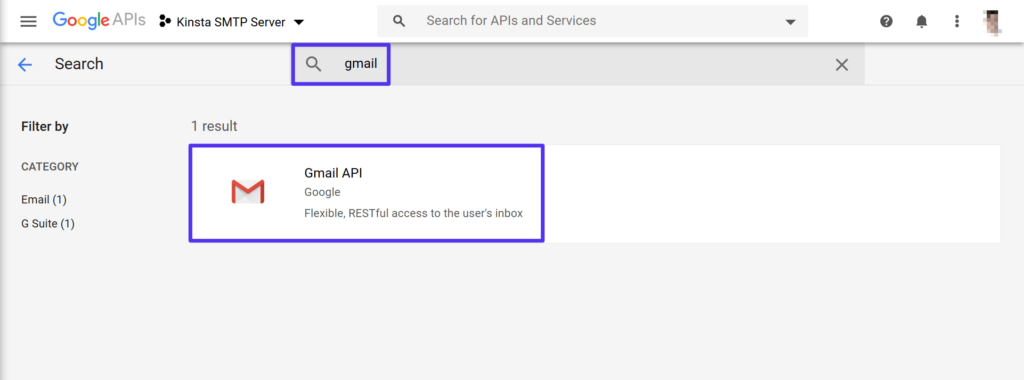
On the next screen, search for "Gmail" and cull the Gmail API upshot:
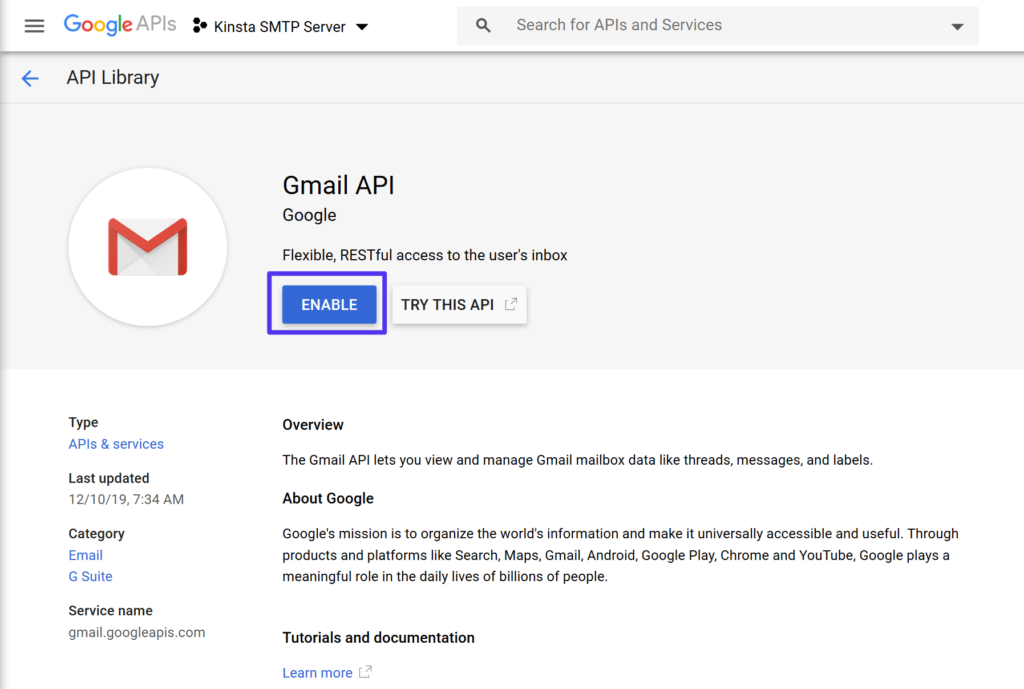
Then, click Enable in the full Gmail API page:
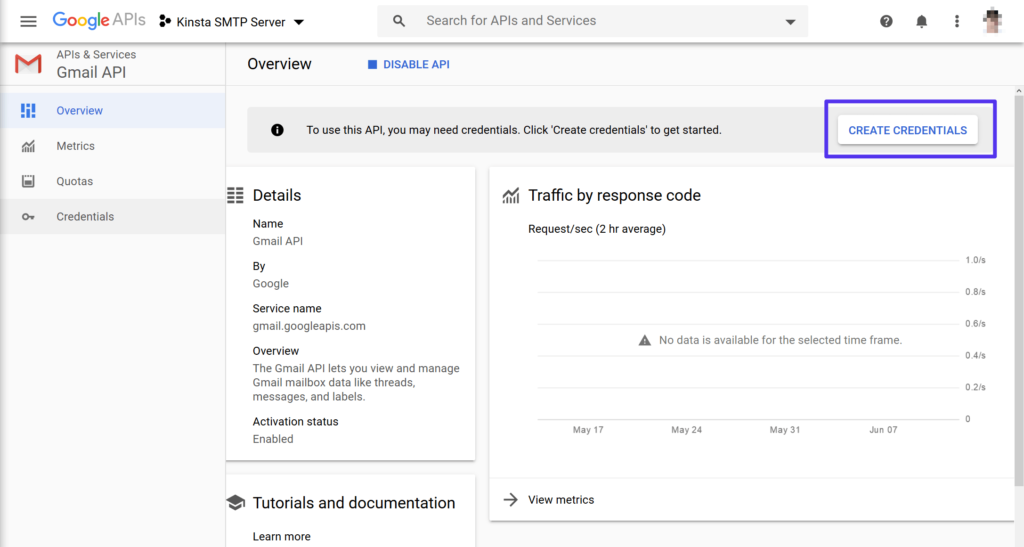
Create Credentials
Now, you should be in a defended interface for the Gmail API. Click the push to Create Credentials:
Subscribe Now
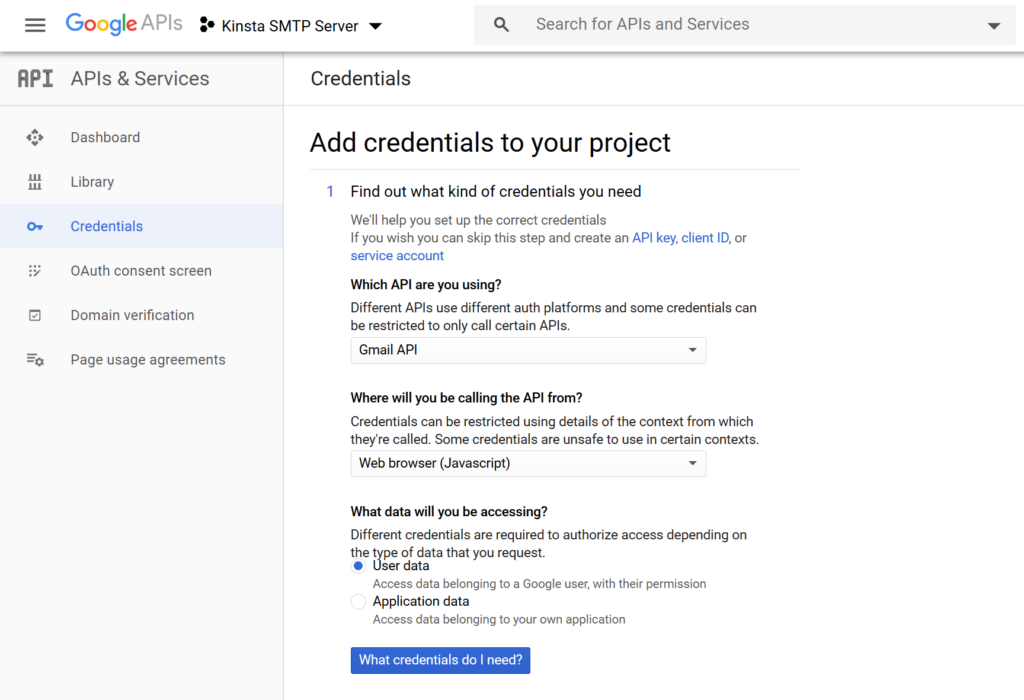
Fill up out the Find out what credentials yous need form using the following data:
- Which API are y'all using? Gmail API
- Where will you be calling the API from? Web browser (JavaScript)
- What information volition y'all exist accessing? User data
In one case you've done that, click the What credentials do I need? button at the lesser.
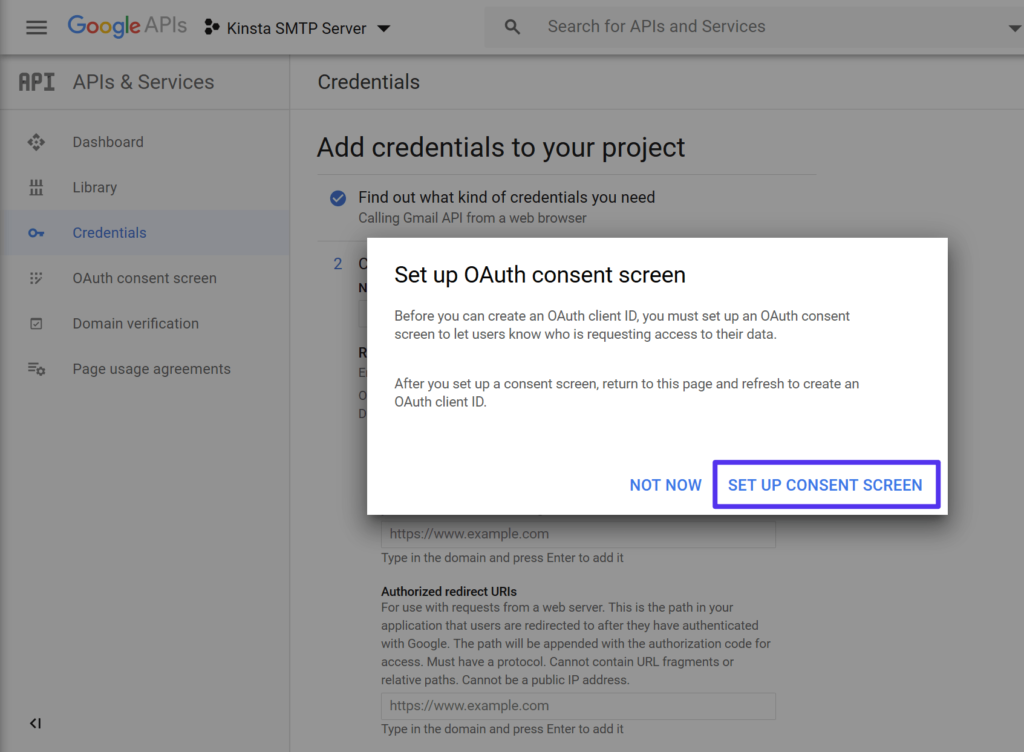
Prepare Up a Consent Screen
Now, Google will prompt yous that you lot need to gear up upward a consent screen. This is the same blazon of authorization screen that yous meet when you use Google to sign upwards/login to a site.
You lot need to do this to satisfy Google'southward requirements, just you don't need to worry near the information that you enter because you'll only be using this for your ain WordPress site.
Click the button to Gear up Up Consent Screen:
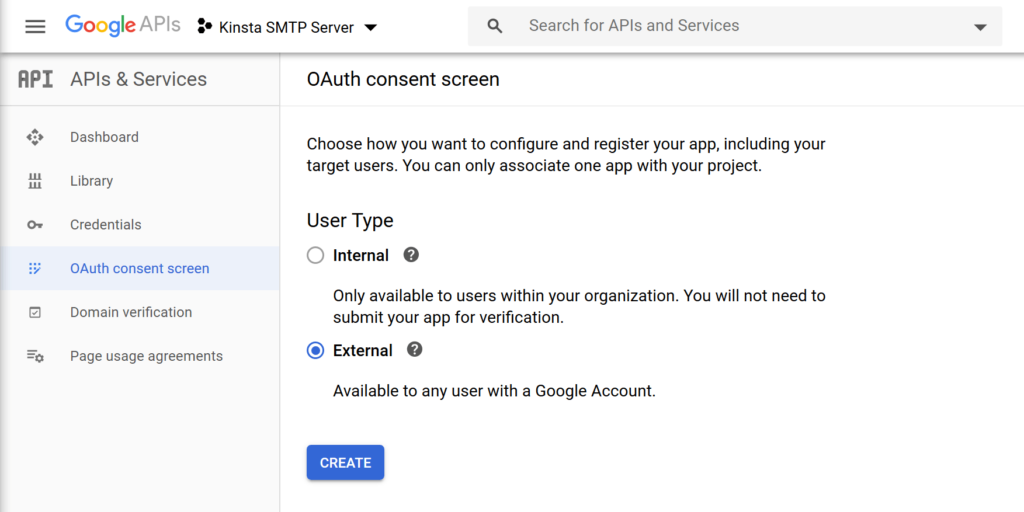
This should open a new tab where you tin configure an OAuth consent screen (keep the original browser tab handy because you lot'll need to go back to it in a 2nd). Nether User Type, select External. So, click Create:
On the next screen, enter bones details for your site. Again – you don't need to worry about what you put here because you're the just person who will run across this information.
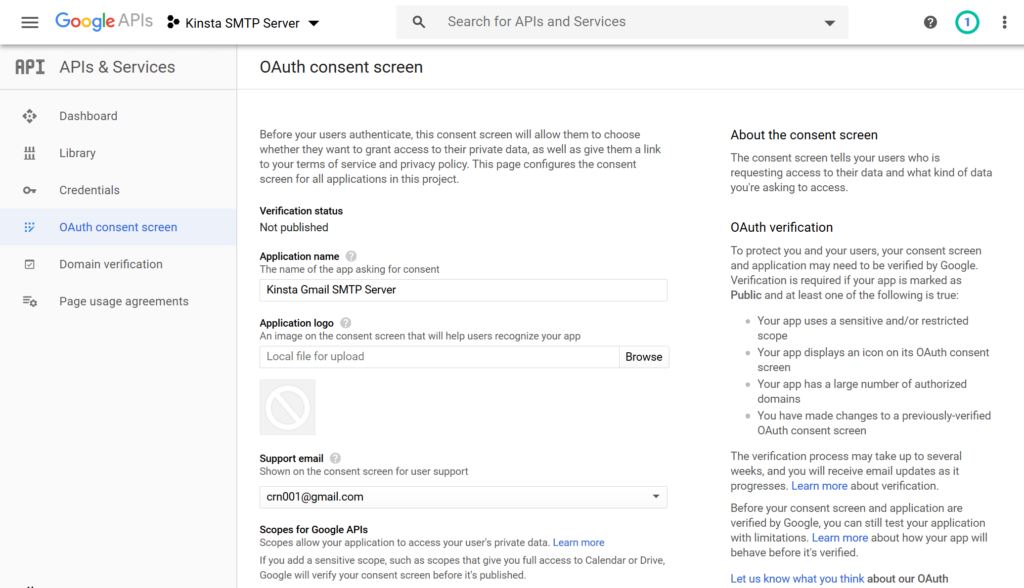
Once you've added the information, click Save at the bottom.
Finish Calculation Credentials to Your Project
At present, go back to the tab that contains the Add credentials to your project interface and enter the following information:
- Proper noun – the name of your website (or anything else that'southward easy to remember).
- Authorized JavaScript origins – you tin can find this in the Post SMTP Mailer/Email Log plugin (Step #1).
- Authorized redirect URIs – you tin can find this in the Post SMTP Mailer/Email Log plugin (Step #1).
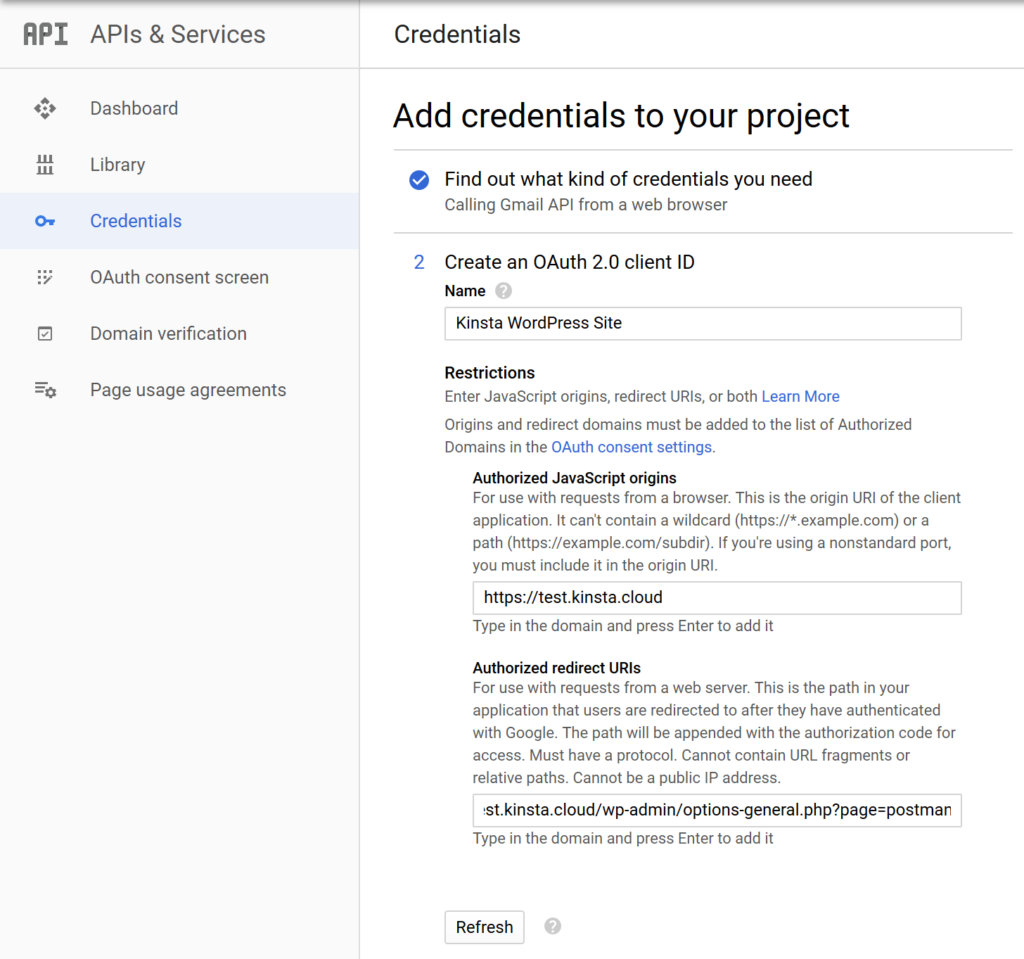
Once y'all've added everything, click Refresh. Then, the Refresh button should change to Create OAuth client ID – click that to finish the process and so click Washed.
Now yous're almost finished!
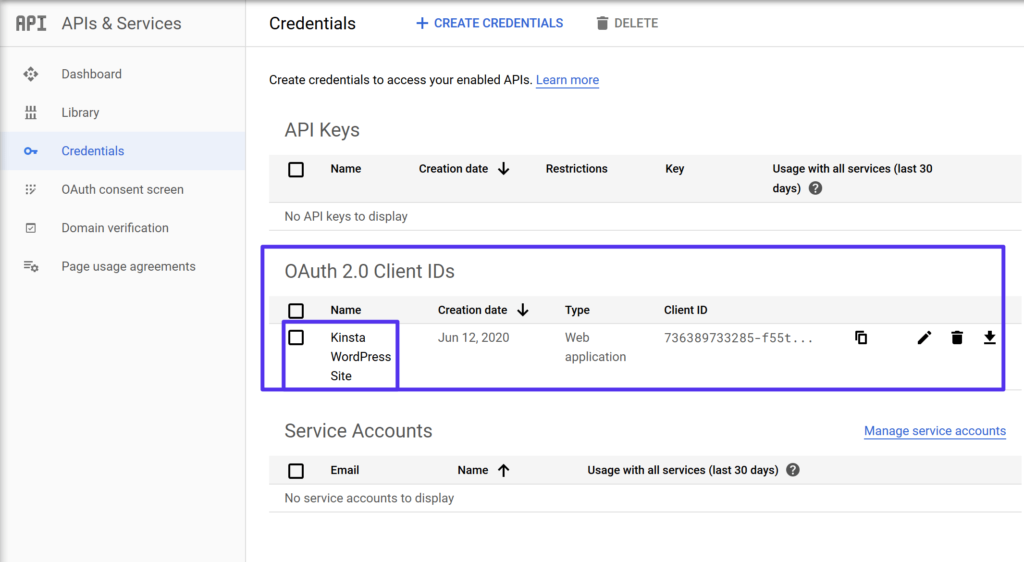
In one case you click Done, you should see a section for OAuth 2.0 Client IDs in the Credentials tab of your project (which should automatically open subsequently yous click Done).
Click on the entry for the proper noun that you but created:
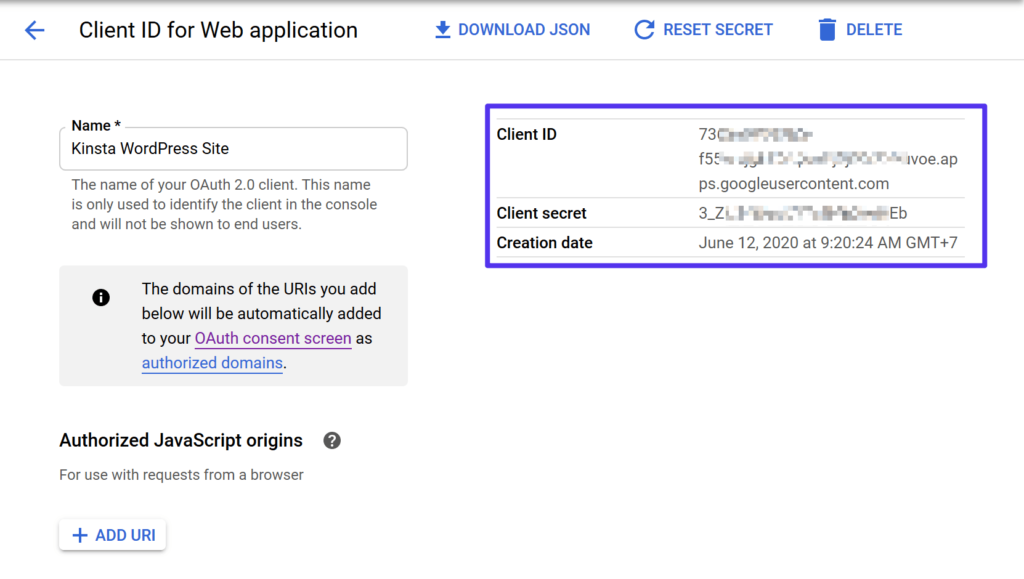
Now, y'all simply demand to discover two pieces of information:
- Client ID
- Client secret
Go along these values accessible considering you're going to need them in the next step:
3. Add together Gmail App Client IDs to Post SMTP Mailer/Email Log
To stop the setup, go back to the Post SMTP Mailer/E-mail Log settings in your WordPress dashboard and paste in the Client ID and Client secret from the previous pace. And so, brand sure to salvage your changes:
Then, the plugin should prompt you to Grant permission with Google:
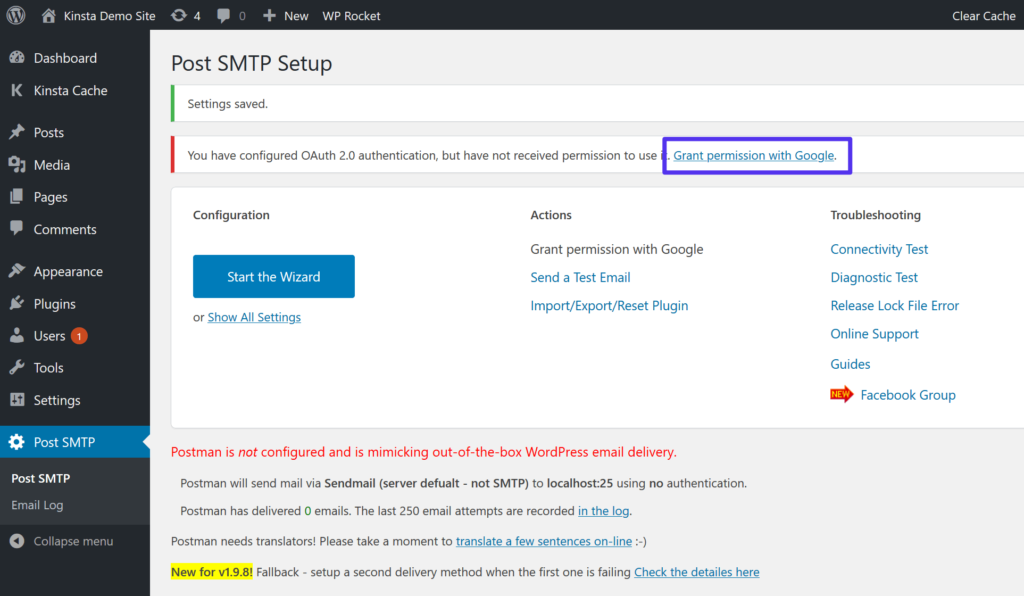
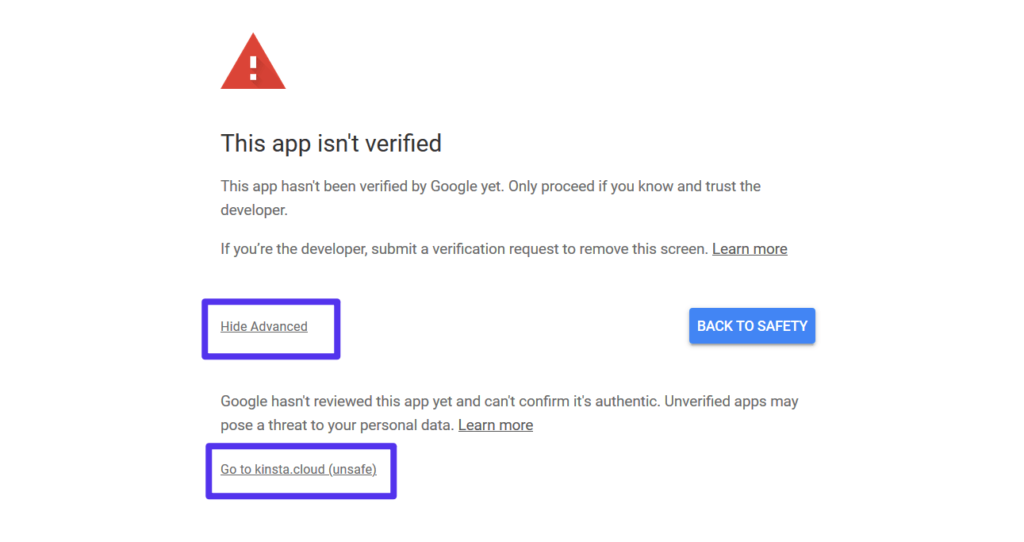
Clicking that link will open the normal Google potency process (again, simply as if you were registering for a site using Google sign-on). However, considering you didn't submit your app to Google for review, Google volition show you lot a warning that "This app isn't verified".
Because this is your own app, you tin can safely ignore the alarm. Click the option to show avant-garde settings so click Become to "yourwebsite.com" (unsafe) link to continue the potency process:
Y'all'll at present become through the regular process. Brand sure to choose the option to Permit your WordPress site to have access to your Gmail account. It needs these permissions to send emails via the Gmail SMTP server.
And that's it! There were quite a few steps, but you lot're now pretty much finished.
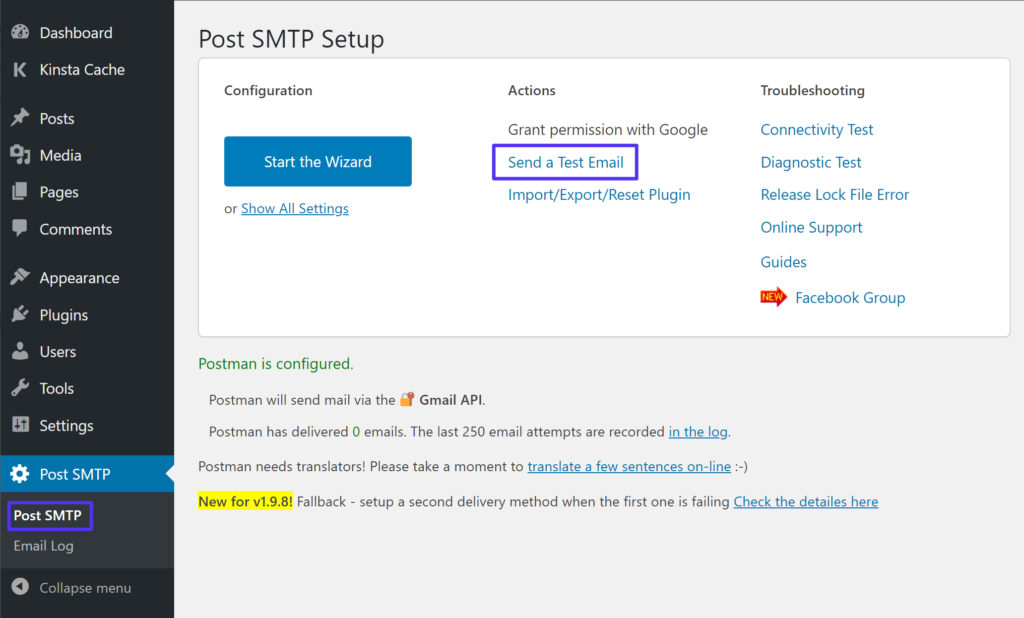
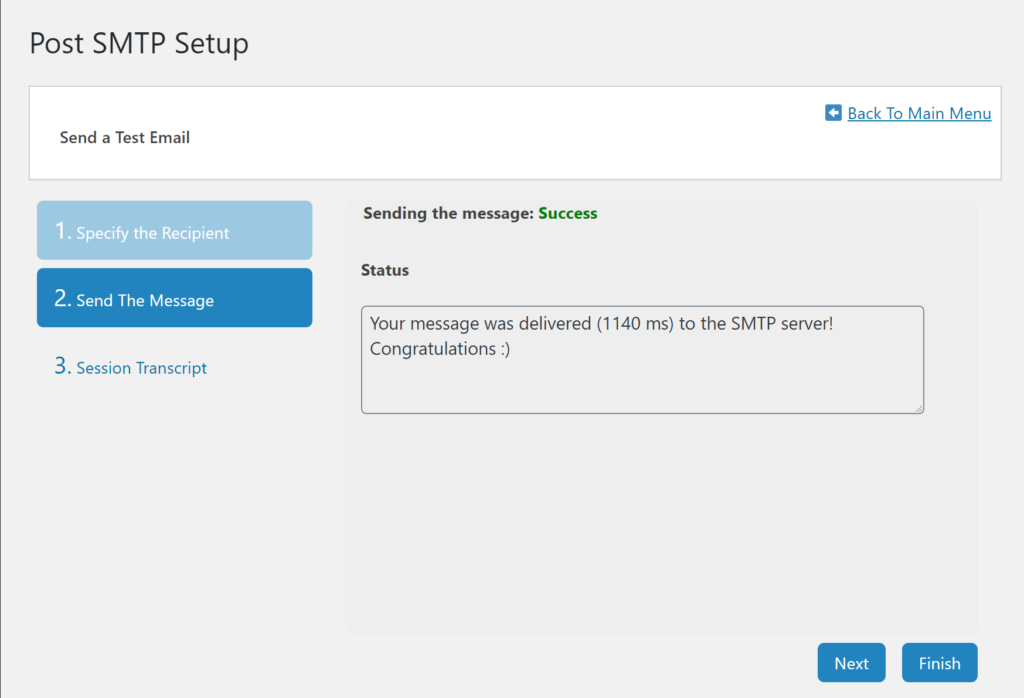
4. Ship a Test Email
To brand sure everything is working, Post SMTP Mailer/Email Log includes an selection to ship a test email. You can admission this from the principal settings page:
Y'all tin can enter the email that you want to ship a test message to.
And then, you should see a success message in the plugin's settings:
And if you go to your e-mail inbox, you lot should also meet a test electronic mail:
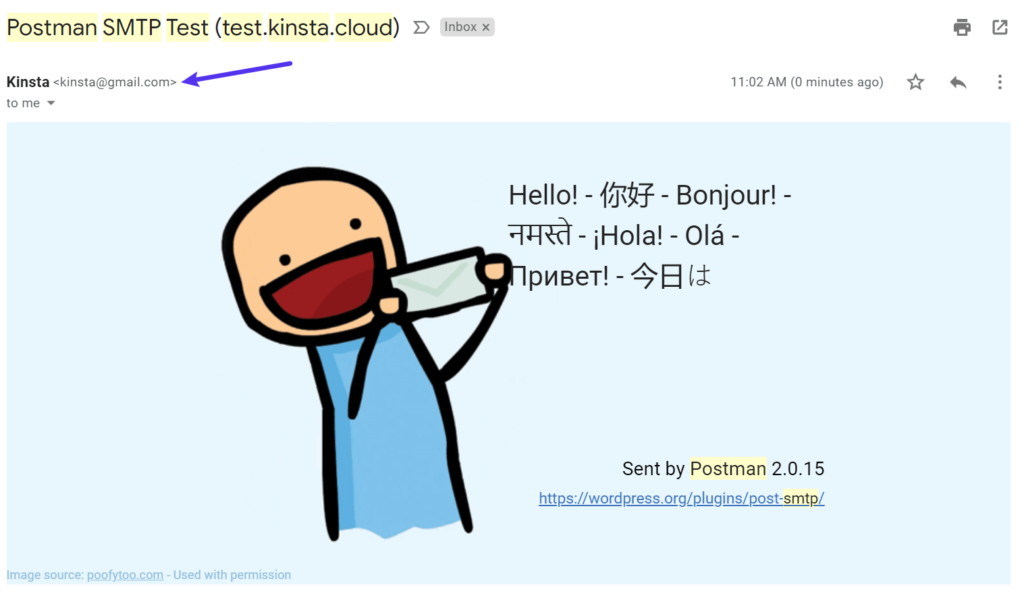
If all goes well, you're finished.
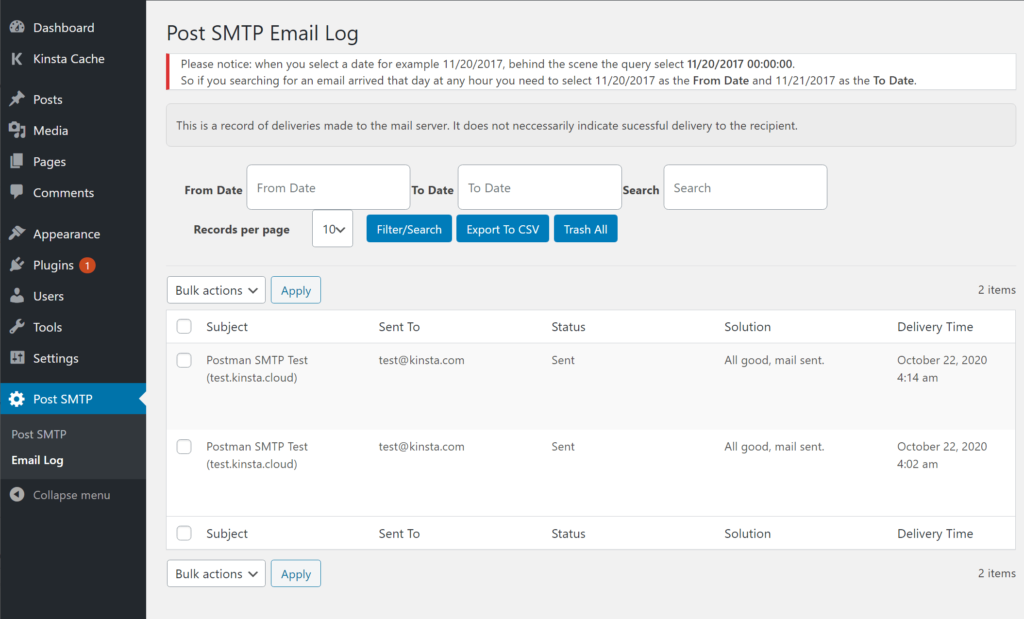
Your WordPress site will at present ship all of its emails using the Gmail SMTP server. You lot tin make sure that this is happening by going to Post SMTP → Email Log. This will list all of the emails that your site sends (along with whatsoever errors if the plugin encounters problems):
Summary
The Gmail SMTP server lets you lot send emails using your Gmail business relationship and Google's servers.
1 option here is to configure tertiary-party e-mail clients, such as Thunderbird or Outlook, to ship emails via your Gmail business relationship. The default Gmail SMTP details are every bit follows:
- Gmail SMTP server accost: smtp.gmail.com
- Gmail SMTP name: Your full name
- Gmail SMTP username: Your full Gmail address (eastward.k. [email protected])
- Gmail SMTP password: The countersign that you use to log in to Gmail
- Gmail SMTP port (TLS): 587
- Gmail SMTP port (SSL): 465
Some other pick is to utilize Gmail to send your WordPress site'due south transactional emails. With a limit of 500 emails per day, Gmail'due south free sending limits are significantly higher than other free SMTP services such as SendGrid or Mailgun.
However, if you lot're doing this, you should send emails via the Gmail API instead of simply using the SMTP server details.
While setting up an app to apply the Gmail API does add some one-fourth dimension complication to the procedure, it's worth the attempt because it gives you a reliable and secure way to send your site'south emails.
Now that you're all set, check out our list of Gmail add-ons to enhance your email productivity.
Exercise you nevertheless accept any questions well-nigh the Gmail SMTP server or how you tin utilize it with WordPress? Ask us in the comments!
Relieve time, costs and maximize site performance with:
- Instant help from WordPress hosting experts, 24/7.
- Cloudflare Enterprise integration.
- Global audience attain with 29 data centers worldwide.
- Optimization with our congenital-in Application Operation Monitoring.
All of that and much more, in one programme with no long-term contracts, assisted migrations, and a 30-day-money-back-guarantee. Bank check out our plans or talk to sales to find the program that'south right for you.

Source: https://kinsta.com/blog/gmail-smtp-server/
Posted by: hickstung1962.blogspot.com
0 Response to "Why Does The Email Service Require Both Smtp And Pop3 To Be Activated?"
Post a Comment