

How To Fetch Backend Service From Reactjs Redux
Understanding how to fetch data into React applications is mandatory for every React developer who aims to build modern, existent-earth spider web applications.
In this guide, we will cover the modern React data-fetching methods and acquire how to handle our application'south state while fetching information. Furthermore, we volition embrace how to handle the awarding's country when something goes wrong with the data.
This promises to be interesting. To follow forth, ensure y'all are familiar with React.
Fetching data from an API in a React app
React beginners might wonder, "What exactly is an API?" To understand what an application programming interface (API) is, let'south think of an application where a section displays the daily conditions forecast of the present city.
While building this type of app, we can create our backend to handle the weather data logic or we can but make our app communicate with a third-party arrangement that has all the conditions information so nosotros only demand to render the information.
Either way, the app must communicate with the backend. This communication is possible via an API, and, in this case, a web API.
Equally the name implies, the API exposes an interface that our app uses to access data. With the API, we don't need to create everything from scratch, simplifying our process. Nosotros only need to gain access to where the data is located then nosotros can use it in our app.
The two common styles for designing spider web APIs are Residual and GraphQL. While this guide focuses on data fetching from the REST API, the fetching strategies are similar for both. Well, ok… we will also see an example of how we can fetch data from a GraphQL API 😊.
Considerations before fetching data
When we request data, we must prepare a land to shop the information upon return. We tin can store it in a state direction tool similar Redux or store it in a context object. But, to keep things simple, nosotros will store the returned data in the React local state.
Adjacent, if the information doesn't load, we must provide a state to manage the loading stage to amend the user experience and another state to manage the error should anything go wrong. This gives us three state variables like then:
const [information, setData] = useState(zilch); const [loading, setLoading] = useState(truthful); const [mistake, setError] = useState(cypher);
Here, we have given the states default values.
The useEffect Hook
When we asking to fetch data from the backend, we perform a side result, which is an operation that can generate different outputs for the same data fetching. For case, the same request returns a success or error.
In React, we should avoid performing side effects direct within the component body to avoid inconsistencies. Instead, we can isolate them from the rendering logic using the useEffect Hook.
In this case, we will fetch our data in the Hook similar so:
useEffect(() => { // data fetching hither }, []); The implementation above will run and fetch data on a component mountain, that is, on the first render. This is sufficient for most of our use cases.
In other scenarios, however, when nosotros need to refetch data after the first return, nosotros can add dependencies in the assortment literal to trigger a rerun of useEffect.
At present that we covered the nuts, we can get started with the first fetching method.
Using the JavaScript Fetch API
The Fetch API through the fetch() method allows us to brand an HTTP request to the backend. With this method, we can perform different types of operations using HTTP methods like the Become method to request information from an endpoint, POST to send data to an endpoint, and more than.
Since we are fetching data, our focus is the Get method.
fetch() requires the URL of the resource we want to fetch and an optional parameter:
fetch(url, options)
We can also specify the HTTP method in the optional parameter. For the GET method, we have the following:
fetch(url, { method: "GET" // default, then we can ignore }) Or, we tin can but ignore the optional parameter considering Get is the default:
fetch(url)
Every bit mentioned earlier, we will fetch data from a Rest API. We could employ any API, but hither we will utilise a free online API called JSONPlaceholder to fetch a list of posts into our application; here is a list of the resources we can asking
Past applying what we've learned so far, a typical fetch() asking looks similar the following:
import { useState, useEffect } from "react"; export default role App() { const [data, setData] = useState(aught); const [loading, setLoading] = useState(truthful); const [error, setError] = useState(zero); useEffect(() => { fetch(`https://jsonplaceholder.typicode.com/posts`) .and then((response) => console.log(response)); }, []); render <div className="App">App</div>; } In the code, we are using the fetch() method to request post data from the resource endpoint as seen in the useEffect Claw. This functioning returns a promise that could either resolve or reject.
If it resolves, nosotros handle the response using .then(). But at this stage, the returned data is a Response object, which is not the bodily format that we demand, although information technology is useful to check for the HTTP status and to handle errors.
Discover nosotros've logged the response. See what nosotros have in return in the console:
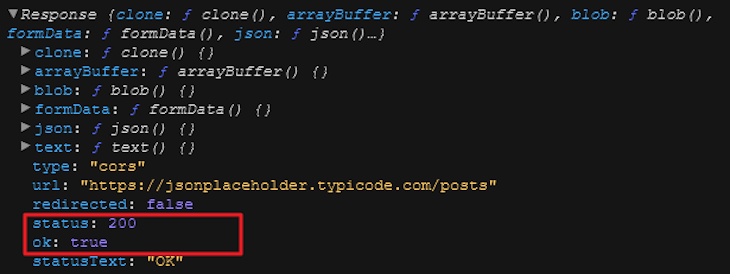
Take annotation of the Response'southward OK condition; we will utilise it later to cheque for unsuccessful HTTP calls.
Side by side, we must resolve the Response object to JSON format using the json() method. This also returns a promise and from in that location, we can resolve to get the bodily data that we need:
useEffect(() => { fetch(`https://jsonplaceholder.typicode.com/posts`) .then((response) => response.json()) .so((actualData) => console.log(actualData)); }, []); Now, we have a list of 100 posts fetched from our API. Open the console in this CodeSandbox to see the information.
In example the hope rejects, we will handle the error using the .catch() similar then:
useEffect(() => { fetch(`https://jsonplaceholder.typicode.com/posts`) .then((response) => response.json()) .so((actualData) => console.log(actualData)) .catch((err) => { panel.log(err.message); }); }, []); Note that the promise returned from the fetch() method but rejects on a network failure; it won't reject if we striking a wrong or nonexisting endpoint similar …/postssss. In this case, .grab() will not take hold of that error, so we must manually handle that.
Earlier nosotros saw how the Response object returns the HTTP status. The OK status is truthful if we hit the correct endpoint, else it returns faux. By checking for that condition, nosotros can write a custom error message for a "404 Non Found" like then:
if (!response.ok) { throw new Error( `This is an HTTP fault: The status is ${response.status}` ); } And, the useEffect Hook now looks like this:
useEffect(() => { fetch(`https://jsonplaceholder.typicode.com/posts`) .then((response) => { if (!response.ok) { throw new Error( `This is an HTTP error: The status is ${response.status}` ); } render response.json(); }) .then((actualData) => console.log(actualData)) .grab((err) => { panel.log(err.message); }); }, []); In the lawmaking block, we check if the R``esponse'due south OK condition is false, pregnant we accept a 404 status followed by throwing our custom error message.
When we throw an error in the .and so() block, .catch() detects and uses our custom message whenever we hit a "404 Not Found."
Rendering the posts in the frontend
Soon, we accept the posts in the console. Instead, we want to render them in our app. To do that, we'll commencement limit the total post number to eight instead of the 100 posts returned for brevity.
We tin can exercise that past appending a query string parameter (?_limit=8) to the request URL:
fetch(`https://jsonplaceholder.typicode.com/posts?_limit=8`)
Next, we must update the country and return the UI:
// ... export default function App() { // ... useEffect(() => { fetch(`https://jsonplaceholder.typicode.com/posts?_limit=8`) .then((response) => { // ... }) .then((actualData) => { setData(actualData); setError(null); }) .catch((err) => { setError(err.bulletin); setData(zero); }) .finally(() => { setLoading(fake); }); }, []); return ( <div className="App"> <h1>API Posts</h1> {loading && <div>A moment delight...</div>} {error && ( <div>{`There is a problem fetching the post data - ${error}`}</div> )} <ul> {data && data.map(({ id, title }) => ( <li key={id}> <h3>{championship}</h3> </li> ))} </ul> </div> ); } In the lawmaking, we update the country data and the error message using the setData and setError, respectively. We likewise added the .finally block that runs when the promise settles.
This is a skillful place to cancel the loading result. Discover that we reset the error and information in the .then() and .catch(), respectively, which prevents inconsistencies for temporary server failure.
See the project on CodeSandbox; nosotros've also added styles to ameliorate the visual.

Using the async/look syntax
The previous method explained information fetching using the pure promise syntax. Here nosotros will learn a more than elegant method to go data using the async/await.
When we brand a request and expect a response, we tin add the wait syntax in front of the function to wait until the promise settles with the outcome. But, to utilize this syntax, we must call it inside the async function in typical JavaScript code.
In the case of fetch``(), the syntax looks like so:
useEffect(() => { async function getData() { const response = await fetch( `https://jsonplaceholder.typicode.com/posts?_limit=ten` ) panel.log(response) } getData() }, []) In the code, we apply the look to look for the promise from fetch(). Remember, nosotros need the data in json() format, and so let's await for that as well:
useEffect(() => { async part getData() { const response = await fetch( `https://jsonplaceholder.typicode.com/posts?_limit=10` ) let actualData = await response.json(); console.log(actualData) } getData() }, []) Notice nosotros don't chain .then as we've done in the previous method. However, it'due south fine to apply .then() with async/await:
useEffect(() => { async function getData() { const actualData = await fetch( `https://jsonplaceholder.typicode.com/posts?_limit=10` ).so(response => response.json()); panel.log(actualData) } getData() }, []) In practice, we ofttimes use the async/await with a effort/catch/finally statement to catch errors and manage the loading state. This is similar to using .then, .catch, and .finally in the previous method:
useEffect(() => { const getData = async () => { try { const response = wait fetch( `https://jsonplaceholder.typicode.com/posts?_limit=10` ); if (!response.ok) { throw new Error( `This is an HTTP fault: The condition is ${response.status}` ); } let actualData = await response.json(); setData(actualData); setError(null); } catch(err) { setError(err.message); setData(zippo); } finally { setLoading(simulated); } } getData() }, []) The lawmaking to a higher place is similar to the previous method. Here, when an mistake occurs in the try block, the catch statement catches and controls the error.
See the projection in CodeSandbox.
Using the Axios library
Axios is a hope-based HTTP client that connects to an endpoint. In this section, we will utilize it to fetch mail service data from an endpoint. Unlike the fetch() method, the response returned from this library contains the JSON format nosotros need.
It also has the advantage of robust error handling, so we don't need to bank check and throw an error like nosotros did earlier with the fetch() method.
To use Axios, we must install it:
npm install axios
In one case we import it in our app, like and so:
import axios from "axios"
We can then use it to perform a Go asking:
const response = await axios.get( `https://jsonplaceholder.typicode.com/posts?_limit=x` ); console.log(response)
The library returns an object containing the data we need.
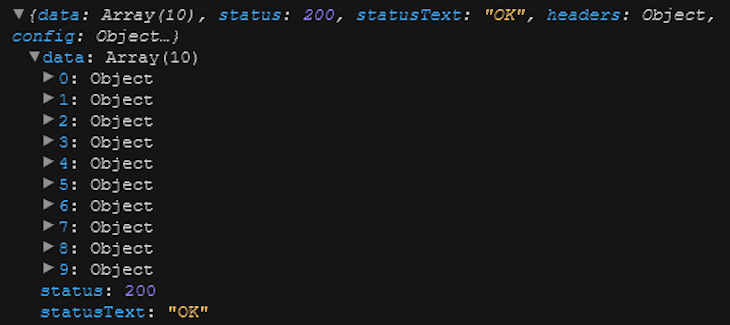
We tin admission the information from the data property with response.data. In the end, our code looks like this:
useEffect(() => { const getData = async () => { try { const response = await axios.go( `https://jsonplaceholder.typicode.com/posts?_limit=10` ); setData(response.data); setError(null); } catch (err) { setError(err.message); setData(cipher); } finally { setLoading(false); } }; getData(); }, []); This is straightforward and more than concise compared to the fetch() method, and you can see information technology working in the CodeSandbox project.
Before we move to the next method, let's apace take a expect at fetching data from the GraphQL API endpoint. Call up, we've been working with a Remainder API up to this bespeak.
Fetching information from a GraphQL API endpoint
This approach is similar to the REST API, except that for a GraphQL API, nosotros perform a Mail service request to the GraphQL server.
In the Mail service query, we provide the exact data we demand and expect a JSON object every bit the response. This approach solves the trouble of over-fetching associated with the Remainder API.
Note that there are libraries made specifically to connect with the GraphQL API and fetched data, like the Apollo Client; here we will go along things simple and use Axios to fetch data.
In this section, we will fetch mission data from the SpaceX GraphQL server by looking for mission_name.
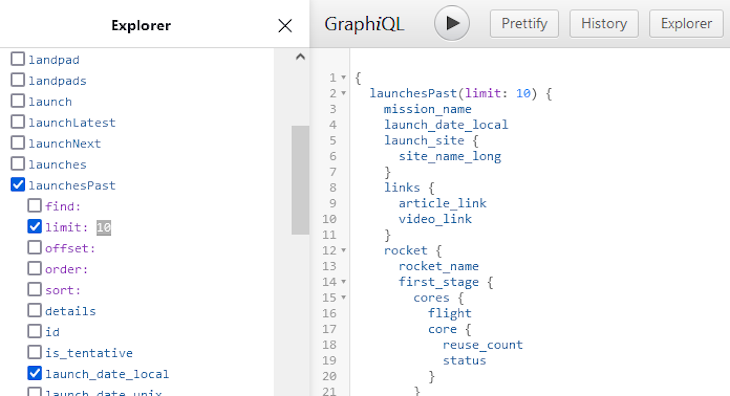
Nosotros can observe the name under the launchesPast in the GraphiQL playground.
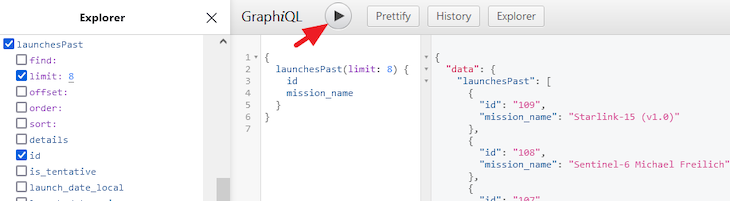
We become the returned data once we press the Play button, and at present we tin apply the query in our lawmaking similar then:
const queriedData = ` { launchesPast(limit: viii) { id mission_name } } `; Next, let's brand a POST request to the server and pass the query inside the request trunk:
const response = await axios.post(`https://api.spacex.land/graphql/`, { query: queriedData }); // wait until the promise resolves console.log(response); If we check the response, we will go the post-obit:
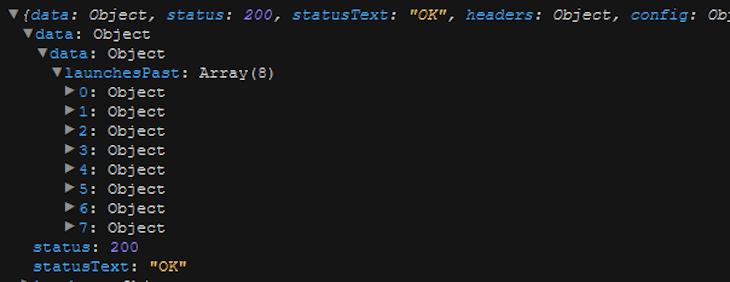
Find where the actual data is located: response.information.data.launchesPast. Now, we tin update the state and render the information in the frontend:
// ... const response = await axios.post(`https://api.spacex.land/graphql/`, { query: queriedData }); setData(response.data.data.launchesPast); // ... 
See the projection on CodeSandbox.
Using the useFetch custom Claw from react-fetch-hook
Up to this bespeak, we've covered most of what nosotros need to fetch data from an API. However, we can go a step further by simplifying data fetching using the useFetch Hook from the react-fetch-hook library.
This is a custom Hook that allows united states to reuse the fetching logic in the same or different components of our app.
To use the library, we must first install it:
npm i react-fetch-hook
Next, we tin can import it in our component like then:
import useFetch from "react-fetch-claw";
Then, call useFetch while passing the endpoint URL and destructure the country (isLoading, data, error) from the object, which nosotros can and so use in our render:
export default function App() { const { isLoading, data, error } = useFetch( "https://jsonplaceholder.typicode.com/posts?_limit=10" ); return ( // ... ); } It doesn't get simpler. See the project on CodeSandbox.
If you lot're wondering how to build a custom Hook that you can reuse just like the above, we've provided one in this CodeSandbox. The code is like to what we've been writing so far. So, you are good to get.
Using the React Query library
With the React Query library, we tin achieve a lot more than just fetching data. It provides support for caching and refetching, which impacts the overall user experience by preventing irregularities and ensuring our app feels faster.
Like the previous method, React Query provides a custom Hook that we tin can reuse throughout our app to fetch data. To use the library, allow's install it:
npm i react-query
Next, we must wrap our parent component with the QueryClientProvider imported from react-query and pass the client instance to it:
import { QueryClient, QueryClientProvider } from "react-query"; const queryClient = new QueryClient(); ReactDOM.return( <StrictMode> <QueryClientProvider client={queryClient}> <App /> </QueryClientProvider> </StrictMode>, // ... ); Next, we must fetch information by calling the useQuery Hook from react-query and pass along a unique query key and function that the query uses to fetch data:
import axios from "axios"; import { useQuery } from "react-query"; consign default office App() { const { isLoading, error, data } = useQuery("posts", () => axios("https://jsonplaceholder.typicode.com/posts?_limit=10") ); console.log(information) return ( // ... ); } Here, we used axios in the fetching function simply nosotros can too use the fetch() method.
The object returned by useQuery is destructured, thus we have the data we need in our render.
Notice nosotros've logged the information inside the lawmaking to see where the actual information is. If nosotros accept a look at the console, the actual data is located in the data holding (data.data).

We tin can and then use the actual data to render the front end. Meet the project in CodeSandbox.
Conclusion
This guide covers almost everything we need to know about modernistic information fetching techniques. We learned to fetch data non only from a REST API simply besides from the GraphQL API.
In addition, nosotros learned how to manage different states like the loading and error states. Now, y'all should experience more confident fetching data into your React app.
If you notice this guide interesting, endeavor to share it effectually the spider web. And if you accept questions and/or contributions, I'g in the comment section.
Full visibility into production React apps
Debugging React applications tin can be difficult, peculiarly when users experience issues that are hard to reproduce. If you're interested in monitoring and tracking Redux state, automatically surfacing JavaScript errors, and tracking boring network requests and component load time, attempt LogRocket. 

LogRocket is like a DVR for web and mobile apps, recording literally everything that happens on your React app. Instead of guessing why problems happen, you can aggregate and written report on what country your application was in when an issue occurred. LogRocket also monitors your app's performance, reporting with metrics like customer CPU load, customer memory usage, and more than.
The LogRocket Redux middleware packet adds an extra layer of visibility into your user sessions. LogRocket logs all deportment and state from your Redux stores.
Modernize how you lot debug your React apps — beginning monitoring for costless.

How To Fetch Backend Service From Reactjs Redux,
Source: https://blog.logrocket.com/modern-api-data-fetching-methods-react/
Posted by: hickstung1962.blogspot.com
0 Response to "How To Fetch Backend Service From Reactjs Redux"
Post a Comment